
Overview
You might be wondering how to get the most out of the Chrome Browser Recorder. Well, this article breaks it down into five essential steps that make it super easy!
- First off, you'll learn how to access the tool and manage permissions.
- Then, it’s all about initiating recordings.
- Editing what you've captured.
- Finally exporting your masterpiece.
Each step comes with detailed instructions and some handy best practices. Remember, clear audio, smart editing techniques, and the right export settings can really enhance the quality and usability of your recordings. So, let’s dive in and make your documentation shine!
Key Highlights:
- To access the Chrome Browser Recorder, open Google Chrome, use Developer Tools, and navigate to the Recorder panel via 'More tools'.
- Familiarise yourself with the Recorder interface to easily start and stop recordings.
- Grant camera and microphone permissions in Chrome settings under 'Privacy and security' to ensure effective recording.
- Start recording by selecting the desired capture area and manage your recording with pause and stop buttons.
- Monitor audio levels during recording to maintain clear sound quality.
- Edit recordings by trimming unnecessary parts, adding annotations, and adjusting audio levels for clarity.
- Export your recording by selecting format options, adjusting export settings, and verifying the final output for quality.
- Use MP4 format for compatibility and aim for 1080p resolution for social media sharing.
Introduction
Mastering the art of screen recording can truly change the way teams communicate and document their processes. Yet, many of us might not realize just how powerful these tools can be! Have you heard about the Chrome Browser Recorder? It’s a fantastic, streamlined solution for capturing workflows, boosting productivity, and creating engaging instructional content. But here’s the thing: navigating its features and settings can feel a bit overwhelming. So, how can you make the most of this tool to ensure your recordings are clear and effective, really resonating with your audience?
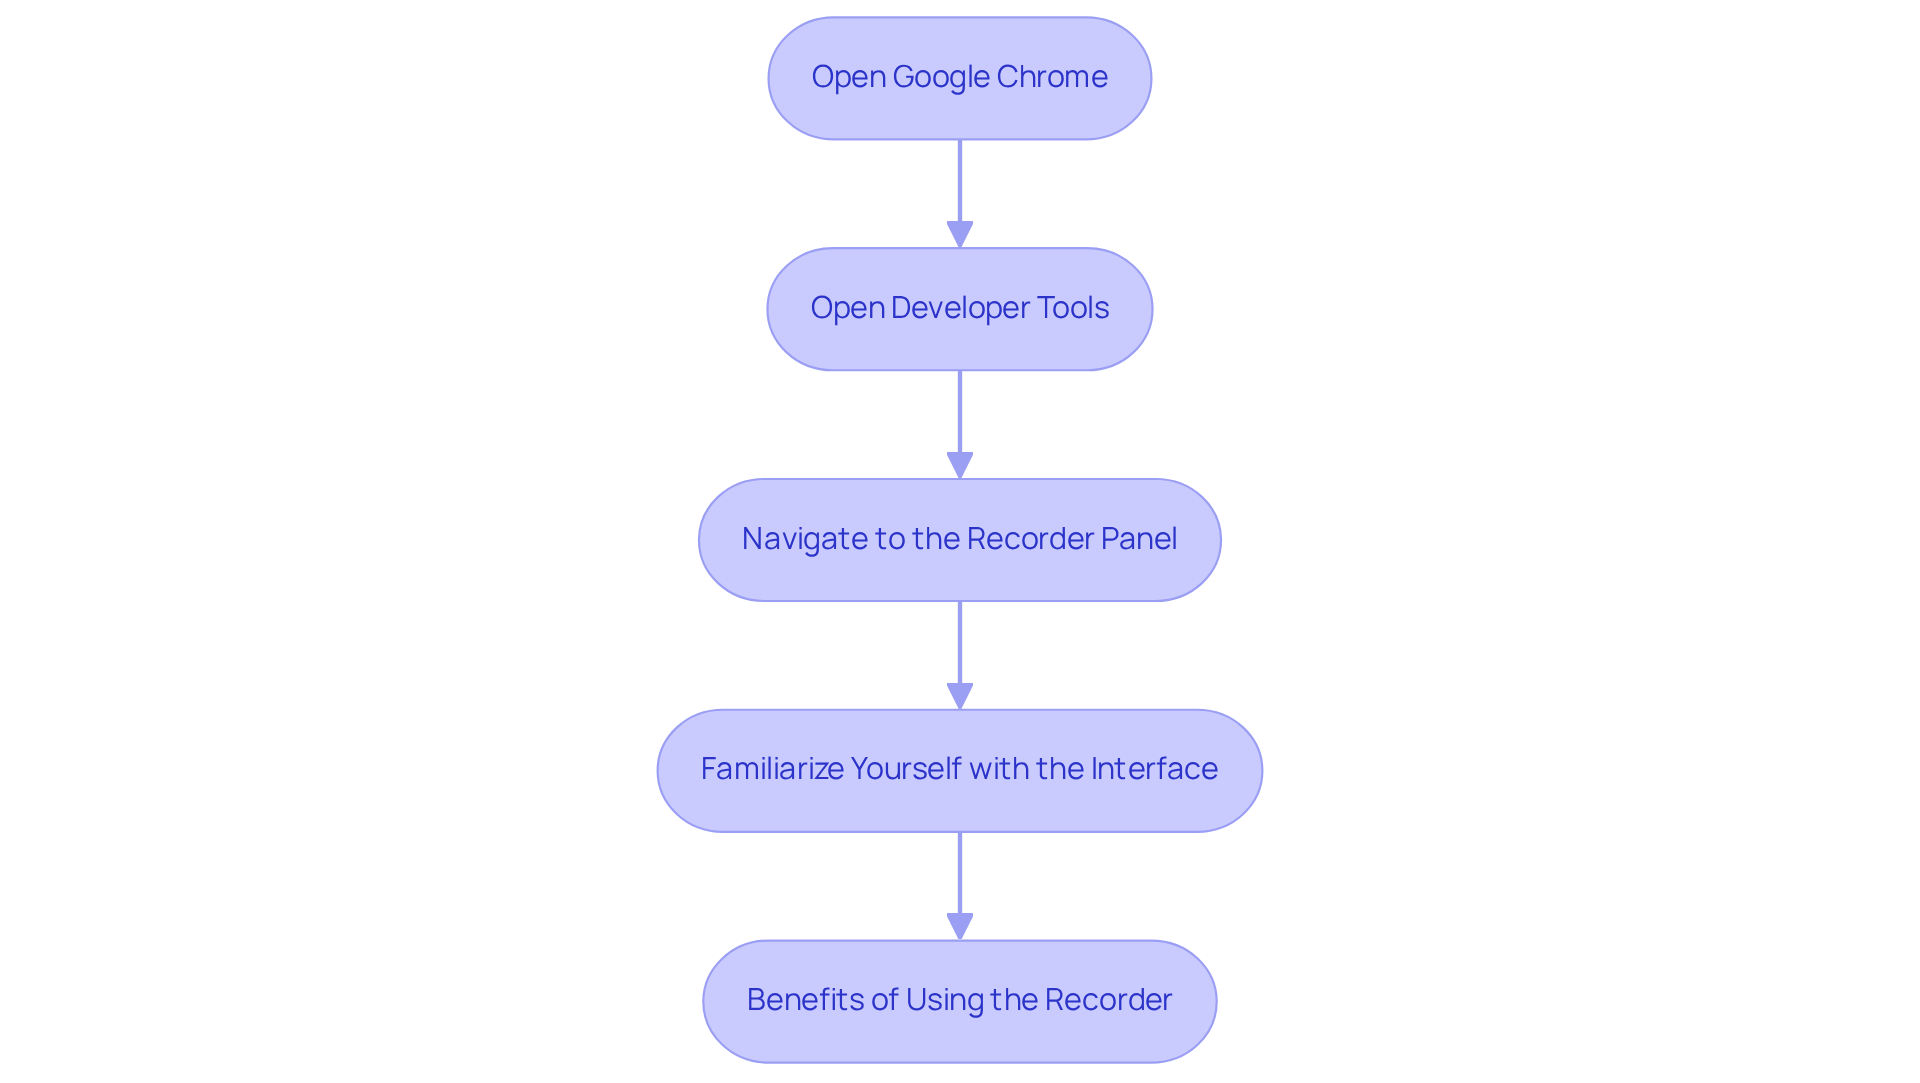
Access the Chrome Browser Recorder
To access , you can follow these simple steps:
- Open Google Chrome: First things first, make sure you’re using the latest version of Chrome. You wouldn’t want to miss out on all the shiny new features and updates, right?
- Open Developer Tools: Now, right-click anywhere on the page and select 'Inspect', or just hit
Ctrl + Shift + I(Windows) orCmd + Option + I(Mac) to bring up Developer Tools. - Navigate to the Recorder Panel: Once you’re in Developer Tools, look for those three vertical dots in the top right corner. Click on them, select 'More tools', and then choose 'Recorder'. Voilà! You’re all set to start capturing.
- Familiarize Yourself with the Interface: Take a moment to explore the Recorder panel. You’ll find the start and stop recording buttons, plus some settings you might want to tweak before diving into your recording.
Utilizing the chrome browser recorder can significantly simplify the process of keeping records. The chrome browser recorder streamlines how you capture workflows and procedures, making it easier to create user guides and maintain your materials effortlessly. Imagine your team having immediate access to everything they need! As industry leaders often point out, having effective recording tools is key to maintaining clarity and structure in operations. Stuart Rudner, a well-known employment attorney, puts it nicely: 'To establish a strong legal stance, proper records are essential.' Trust me, you don’t want to expose yourself to unnecessary liability and costs.
With [SowFlow's tool](https://sowflow.io), rated 4.7 out of 5 from 5,745 reviews and trusted by over 60,000 users, you’re looking at a solid choice for enhancing your record-keeping methods while cutting down on those endless meetings.
Grant Camera and Microphone Permissions
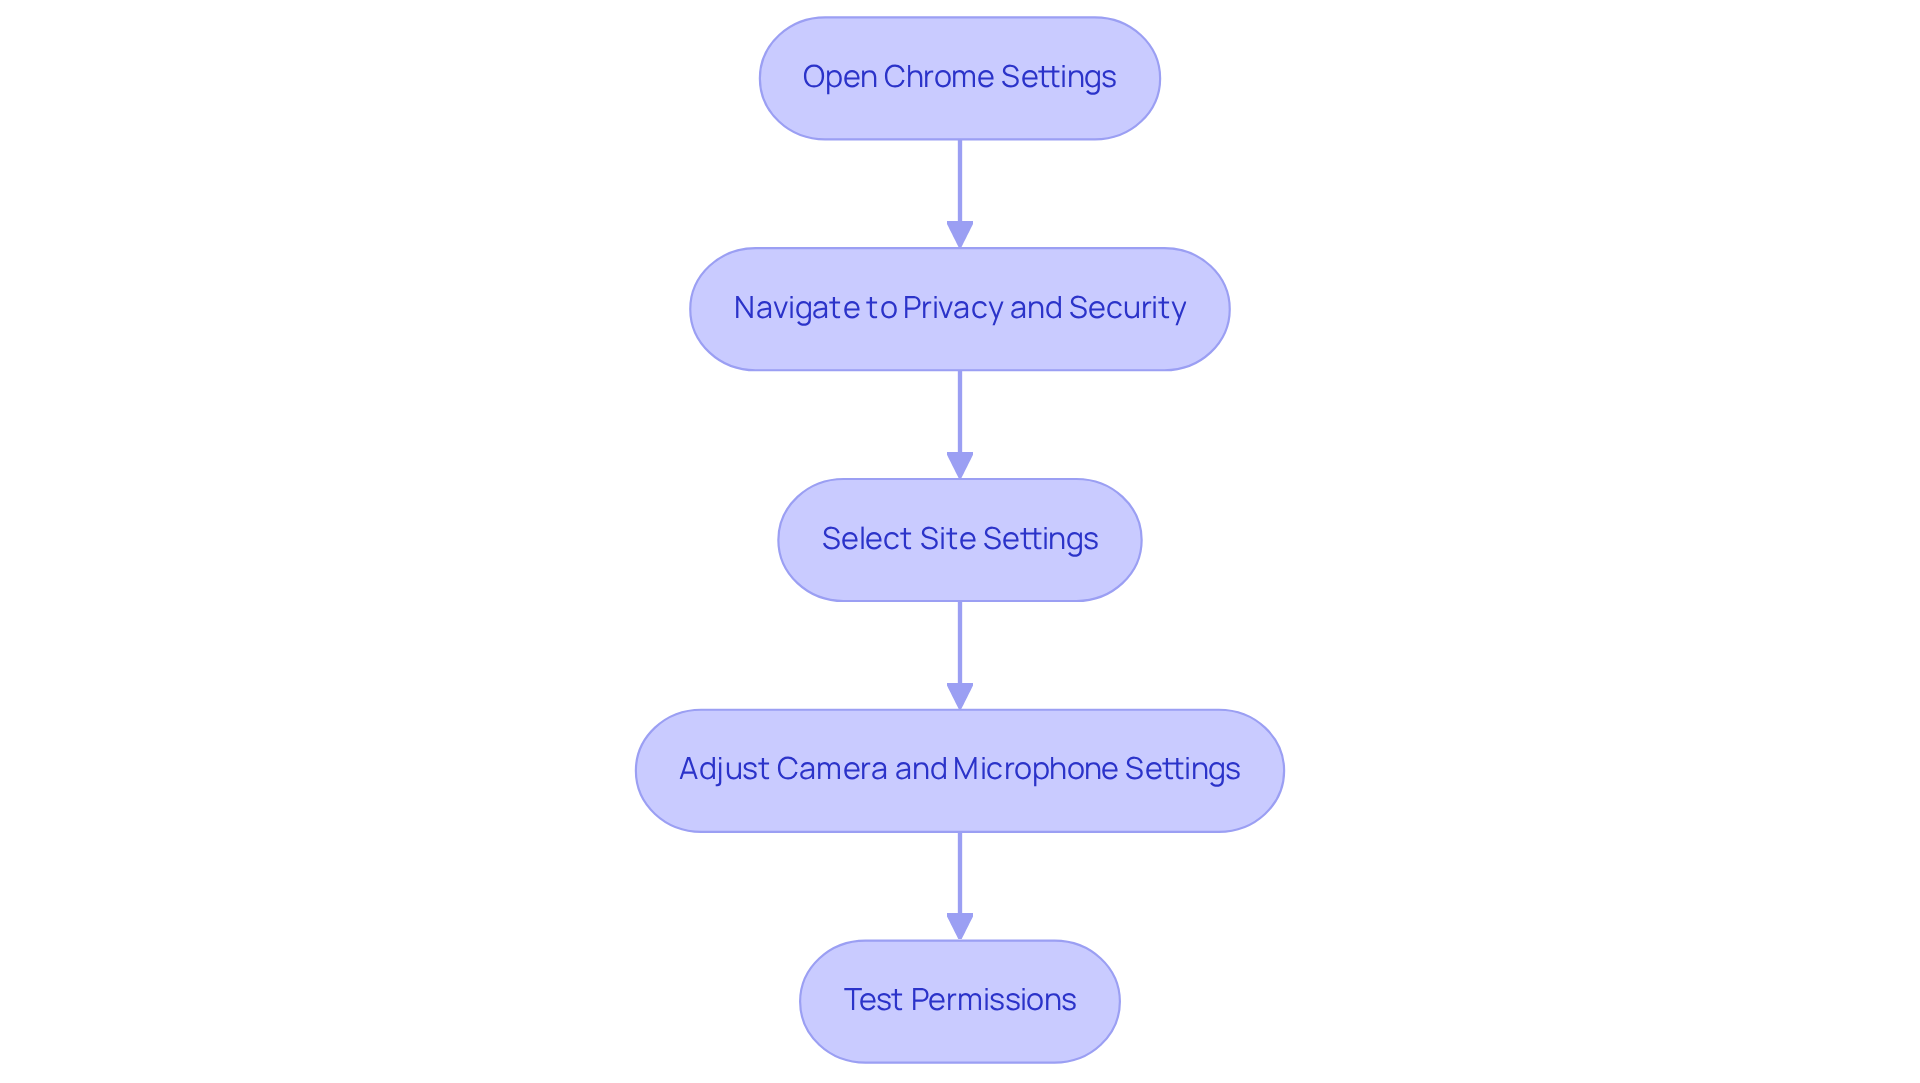
To grant camera and microphone permissions in Chrome, just follow these simple steps:
- Open Chrome Settings: You’ll want to click on in the upper right corner of your browser and select 'Settings'. Easy, right?
- Navigate to Privacy and Security: Look over to the left sidebar and click on 'Privacy and security'.
- Select Site Settings: Under the Privacy and security section, go ahead and click on 'Site settings'.
- Adjust Camera and Microphone Settings: Now, scroll down to 'Permissions' and click on 'Camera' and 'Microphone'. Make sure the sites you want to record from are allowed to access these devices. If they’re blocked, simply change the setting to 'Allow'. This is super important for using SowFlow's tools efficiently, as the chrome browser recorder allows you to record your workflows directly from your browser and store them in your team’s workspace for quick access.
- Test Permissions: Finally, visit a site that requires these permissions to see if everything’s working correctly. If you run into issues, double-check that your microphone is set as the default input device and that the mute switch on your headset is off.
By managing these settings effectively, you can really boost your screen capturing capabilities. This helps streamline your archiving processes and improves overall productivity. After all, not allowing these permissions might keep you from participating in video calls or capturing sessions, which could lead to delays in documentation and hinder your knowledge management efforts. So, let’s get those permissions sorted and keep everything running smoothly!
Initiate and Manage Your Screen Recording
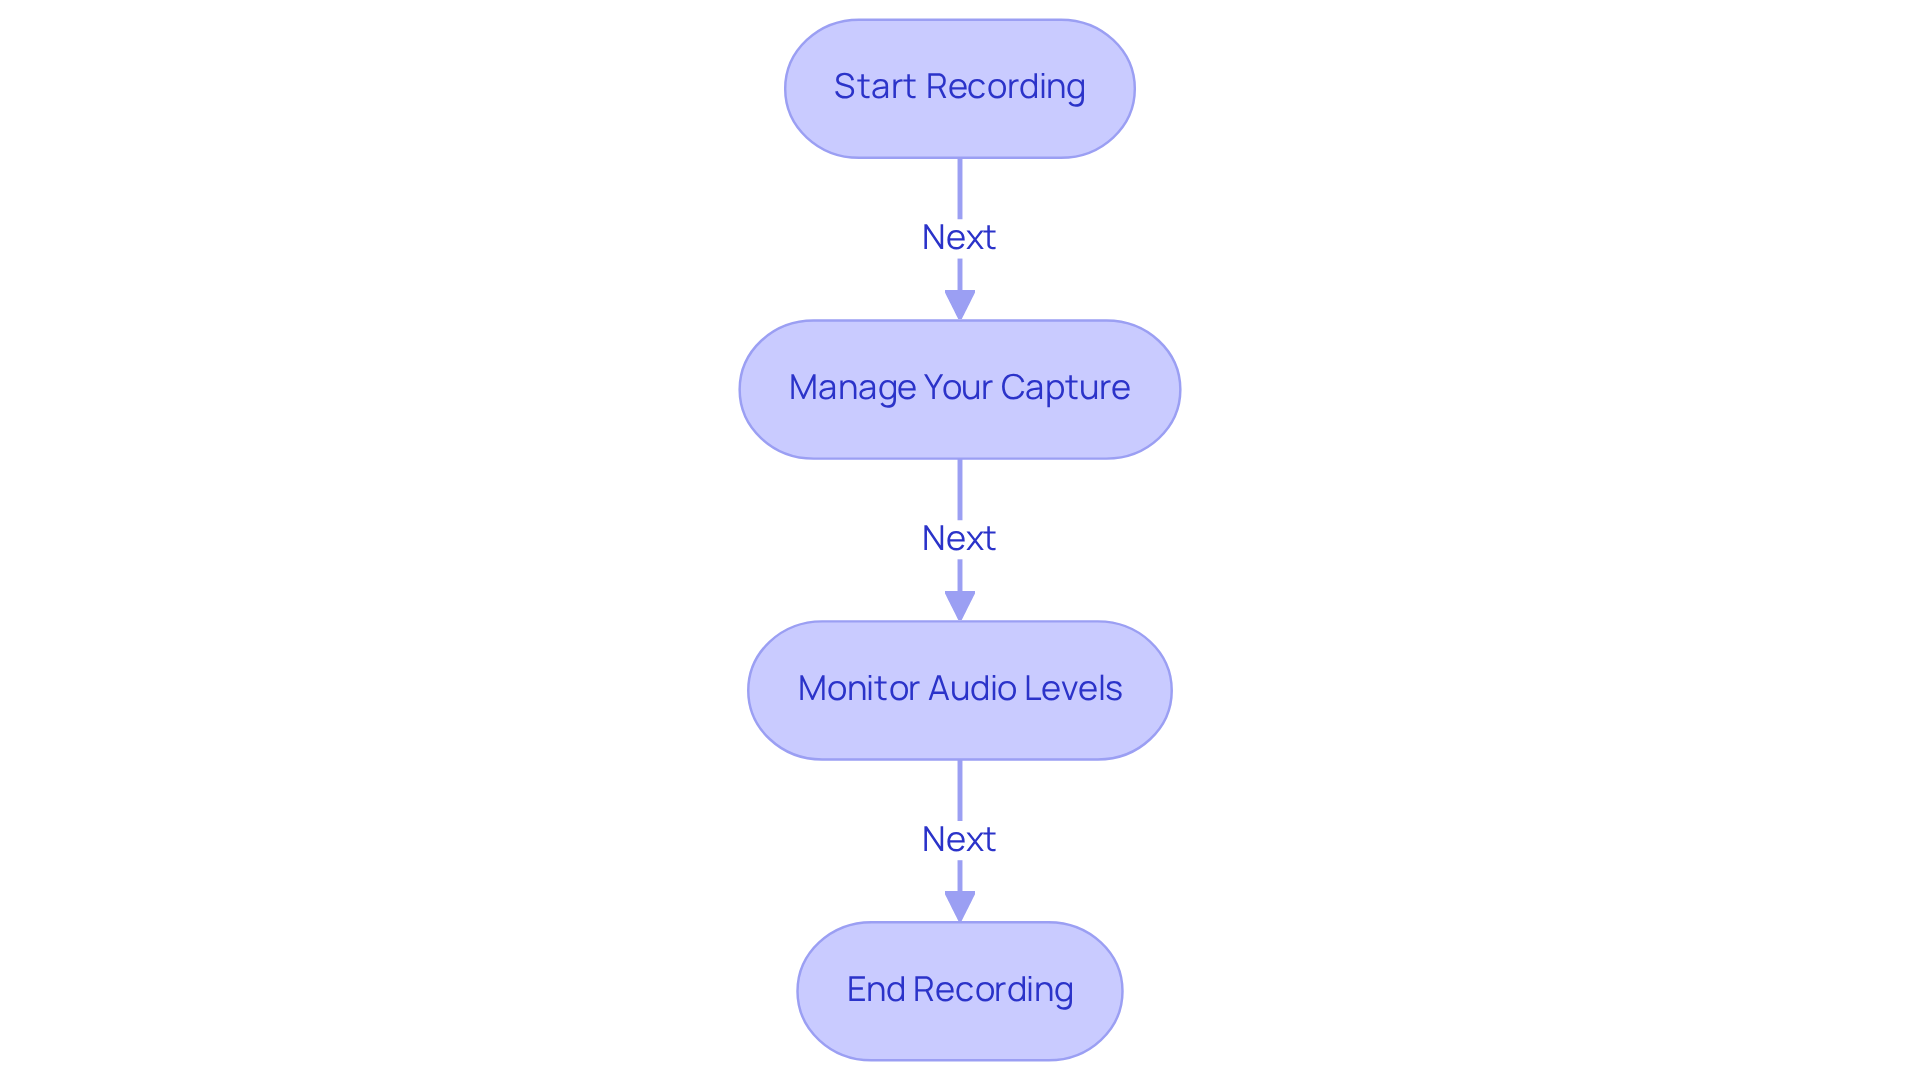
Ready to get started with your screen recording? Let’s walk through the steps together!
- Start Recording: First things first, head over to the Recorder panel and hit that 'Start Recording' button. With the chrome browser recorder, you'll get to choose what you want to capture—be it the whole screen, a specific application window, or just a Chrome tab. How cool is that? This way, you can tailor your recording to fit exactly what you need.
- Manage Your Capture: While you’re recording, you can pause or stop whenever you need using the buttons in the Recorder panel. If you want to switch tabs or applications, just do it carefully to make sure you’re capturing the right stuff. Remember, effective screen capture can really boost user engagement, since video content tends to keep viewers hooked!
- Monitor Audio Levels: Are you capturing sound? Keep an eye on those audio levels! You want to make sure your voice comes through clear and without any distortion. After all, clear audio is key; poor sound quality can really take away from the impact of what you’re capturing.
- End Recording: When you’re done capturing all the good stuff, just click the 'Stop Recording' button. Your audio will be saved automatically, so you can review and edit it whenever you need. Efficient screen capture not only makes record-keeping easier but also boosts your productivity by cutting down on time spent on repetitive clarifications.
By following these steps, you’ll be able to create high-quality audio captures with the chrome browser recorder that can serve as fantastic resources for training, onboarding, or documenting processes. Plus, with , updating and revising your materials is a breeze, keeping everything fresh in our fast-paced business world. So, what are you waiting for? Let’s get recording!
Edit Your Screen Recording
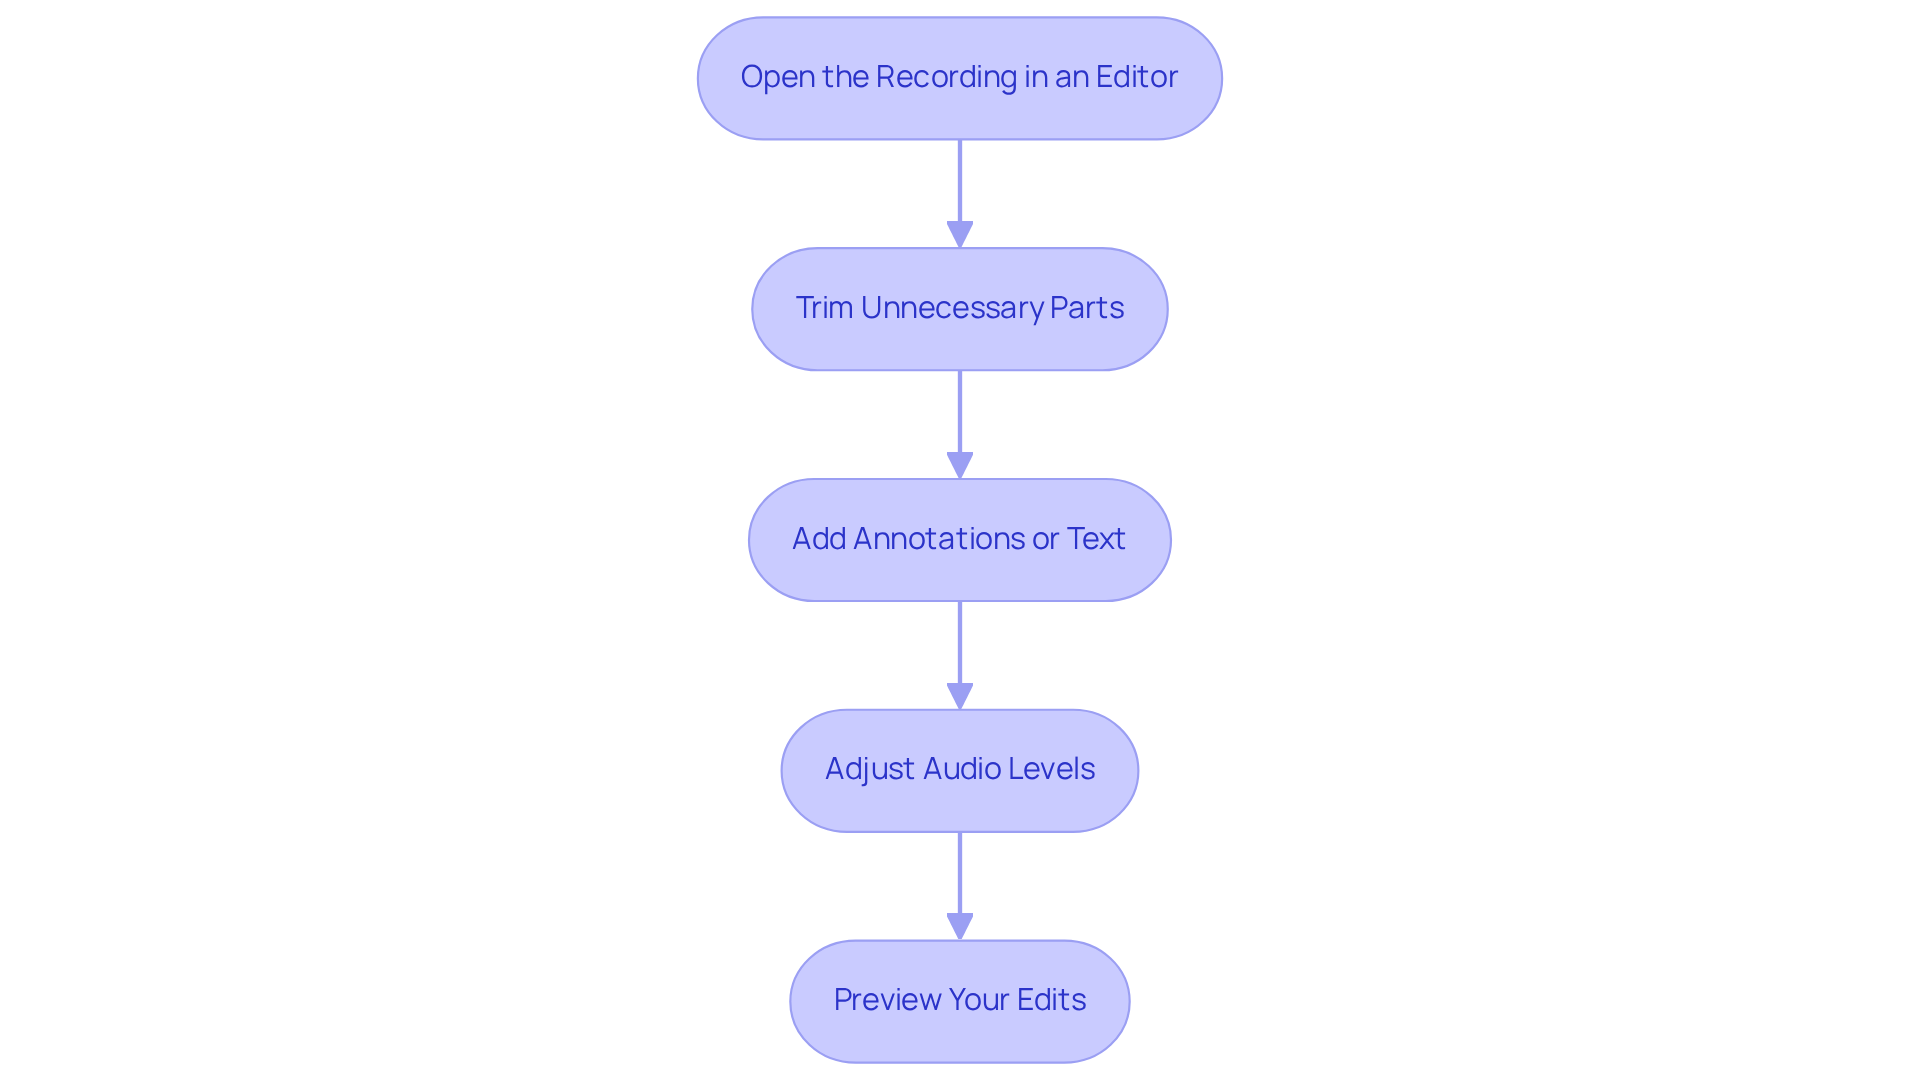
To effectively edit your screen recording, you might be wondering how to get started. Here are some friendly steps to guide you:
- Open the Recording in an Editor: Once you’ve halted the recording, find that file hanging out in your downloads folder and pop it open in your favorite film editing software—maybe iMovie, Adobe Premiere Pro, or QuickTime Player if you’re a macOS user.
- Trim Unnecessary Parts: Now, let’s trim the fat! Use the trimming tool to snip away any unnecessary sections at the beginning or end of your clip. This little tweak ensures you have a polished start and finish.
- Add Annotations or Text: Want to keep your viewers engaged? Consider adding annotations, text overlays, or highlights to emphasize those key points. This technique really helps improve understanding and retention—trust me, it makes your instructional content clearer and more impactful. For instance, businesses that utilize annotations often report a boost in [viewer engagement and comprehension](https://sowflow.io/blog-post/10-essential-accounting-standard-operating-procedure-templates-for-efficiency).
- Adjust Audio Levels: Don’t forget about the sound! Balance those audio levels by adjusting the volume as needed. You want to avoid any abrupt changes that could distract your viewers.
- Preview Your Edits: Finally, give your edited clip a watch to confirm it flows smoothly and effectively conveys your intended message. This final review is crucial for ensuring clarity and coherence in your instructional materials.
Now, speaking of enhancing your content, incorporating advanced editing features like combining and splitting recordings or adding transitions can really take your work up a notch. Statistics show that efficient film editing significantly influences audience retention rates, making these actions vital for producing high-quality instructional materials. By following these steps, you can create visual content that truly resonates with your audience, harnessing the power of annotations and effective editing to enhance your documentation efforts.
Export Your Finished Screen Recording
Ready to export your finished screen recording? Let’s walk through it together!
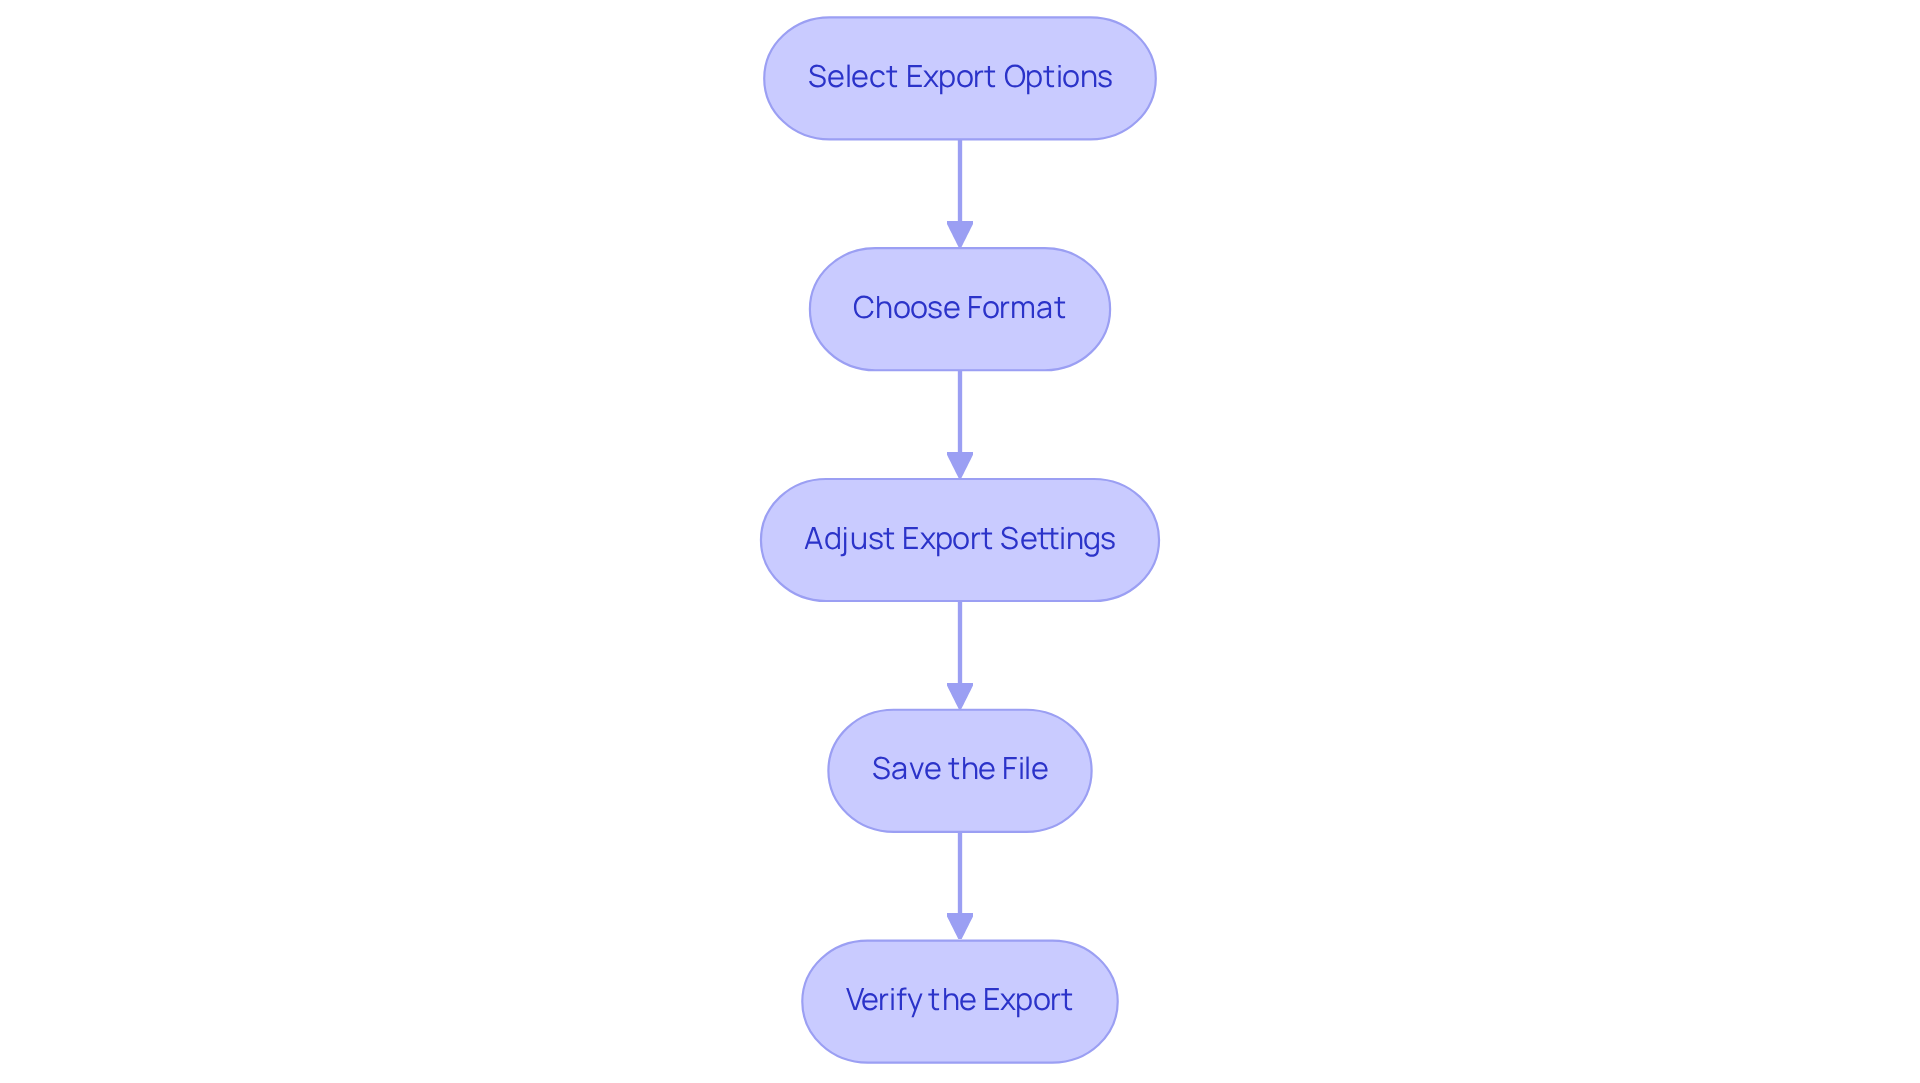
First up, you’ll want to select your export options. Open your editing software, head over to the 'File' menu, and pick 'Export' or 'Save As'. This is your starting point to ensure your recording is prepped for sharing.
Next, it’s time to choose the format. Think about what works best for you—MP4 or MOV are solid options. MP4 is often the go-to because it plays nicely on various platforms, making it a favorite among businesses. For top-notch quality, consider the H.264 codec; it strikes a great balance between file size and visual quality.
Now, let’s adjust those export settings. You might be wondering what resolution to use. A resolution of 1080p is perfect for social media platforms like Facebook and Twitter, giving you a nice balance between quality and file size. If you’re aiming for 1080p at 60fps, shoot for a bitrate of 12-15 Mbps (VBR) to keep that playback smooth. Just remember, higher resolutions mean bigger files, so choose what fits your audience’s needs.
Once you’ve got everything set, it’s time to save the file. Pick a destination folder on your computer and hit 'Save'. Just a heads up, the export process might take a bit, depending on how long and complex your recording is.
Finally, don’t forget to verify the export. After it’s done, find the file and play it back to check if the quality meets your expectations and all your edits are intact. This last step is super important! Well-exported recordings are more likely to grab viewers' attention and get your message across effectively. As director Jarle Leirpoll puts it, 'The bitrate has a direct correlation to the quality of the footage.' Higher bitrates lead to , but they can also result in larger file sizes.
By following these steps, you’ll ensure your screen recordings are exported in a way that maximizes their impact and accessibility. Happy exporting!
Conclusion
You might be wondering how the Chrome Browser Recorder can really change the game when it comes to documenting workflows and procedures. Well, it’s all about making things more efficient and accessible! By following the simple steps outlined, you can tap into this tool's power to create top-notch recordings that become invaluable resources for training, onboarding, and managing knowledge.
Let’s talk about some key insights:
- Granting the necessary permissions for camera and microphone access is crucial.
- Effectively managing your screen recordings and refining the content through editing can really boost the quality of your recordings.
- This not only makes the final product more engaging but also ensures it’s informative.
- Exporting your recordings in the right format and resolution is essential for keeping everything visually appealing and accessible across different platforms.
Incorporating these practices can seriously streamline your documentation efforts and ramp up productivity within your team. Embracing what the Chrome Browser Recorder has to offer not only enhances communication but also empowers you to create impactful instructional materials. So, why wait? Let’s put these steps into action and raise the bar for record-keeping and training in your organization!
Frequently Asked Questions
How do I access the Chrome Browser Recorder?
To access the Chrome Browser Recorder, open Google Chrome and ensure it's the latest version. Then, right-click on the page and select 'Inspect' or press Ctrl + Shift + I (Windows) or Cmd + Option + I (Mac) to open Developer Tools. In Developer Tools, click on the three vertical dots in the top right corner, select 'More tools', and then choose 'Recorder'.
What can I do with the Chrome Browser Recorder?
The Chrome Browser Recorder simplifies the process of capturing workflows and procedures, making it easier to create user guides and maintain materials. It provides immediate access to recorded content, which enhances clarity and structure in operations.
Why is it important to have effective recording tools?
Effective recording tools are essential for maintaining clarity and structure in operations. Proper records help establish a strong legal stance and reduce exposure to liability and costs, as emphasized by industry leaders.
How can I grant camera and microphone permissions in Chrome?
To grant camera and microphone permissions, click on the three dots in the upper right corner of Chrome and select 'Settings'. Navigate to 'Privacy and security' in the left sidebar, then click on 'Site settings'. Scroll down to 'Permissions', click on 'Camera' and 'Microphone', and ensure the sites you want to record from are allowed access.
What should I do if I encounter issues with camera and microphone permissions?
If you encounter issues, check that your microphone is set as the default input device and that the mute switch on your headset is off. Additionally, visit a site that requires these permissions to test if everything is working correctly.
How do camera and microphone permissions enhance my recording capabilities?
Granting camera and microphone permissions allows you to use tools like the Chrome Browser Recorder efficiently, enabling you to record workflows directly from your browser and store them in your team’s workspace, thus streamlining your archiving processes and improving overall productivity.
👍
What others are liking
5 Steps to outline your ideal documentation structure
5 MINS READ
Where to start the your journey of mapping out your ideal documentation structure, aligning it with the very heartbeat of your organization?
Defining a winning level of detail in your process
3 MINS READ
What is too much detail, and what is too little? This article described in that winning level detail about what detail is enough.


